
As of version 2.0.0.1873 BETA, StableBit Scanner 2.0 adds file recovery.
More Information about the StableBit Scanner is available here: http://stablebit.com/Scanner
This means that after one or more bad sectors are found on a hard drive, you will have the option of running a file scan, and once that completes, you’ll be able to select one or more damaged files for recovery.

Users of Scanner 1.0 may remember this feature. In Scanner 2.0 it has a new UI and some improvements on the back-end.
Let’s take a look at exactly how this works in Scanner 2.0.
A Damaged Hard Drive
The StableBit Scanner will periodically check the surface of all your hard drives for damaged sectors.
This is what it looks like when the Scanner detects some damage on a hard drive:

(note that you can simulate this by using the Simulate tab in Scanner Settings.)
As you can see from the screenshot, there are 972 unreadable sectors on this disk. Note that, these sectors have actually failed a read, which is unlike a S.M.A.R.T. warning which is an indication by the hard drive of unverified damage.
Notice that there are only a few red blocks in that sector map. This is because the Scanner represents multiple sectors that are damaged in the same block, with just one red block. This makes it easier to read the map.
We can see the actual damage represented by a red block by hovering our mouse over it:
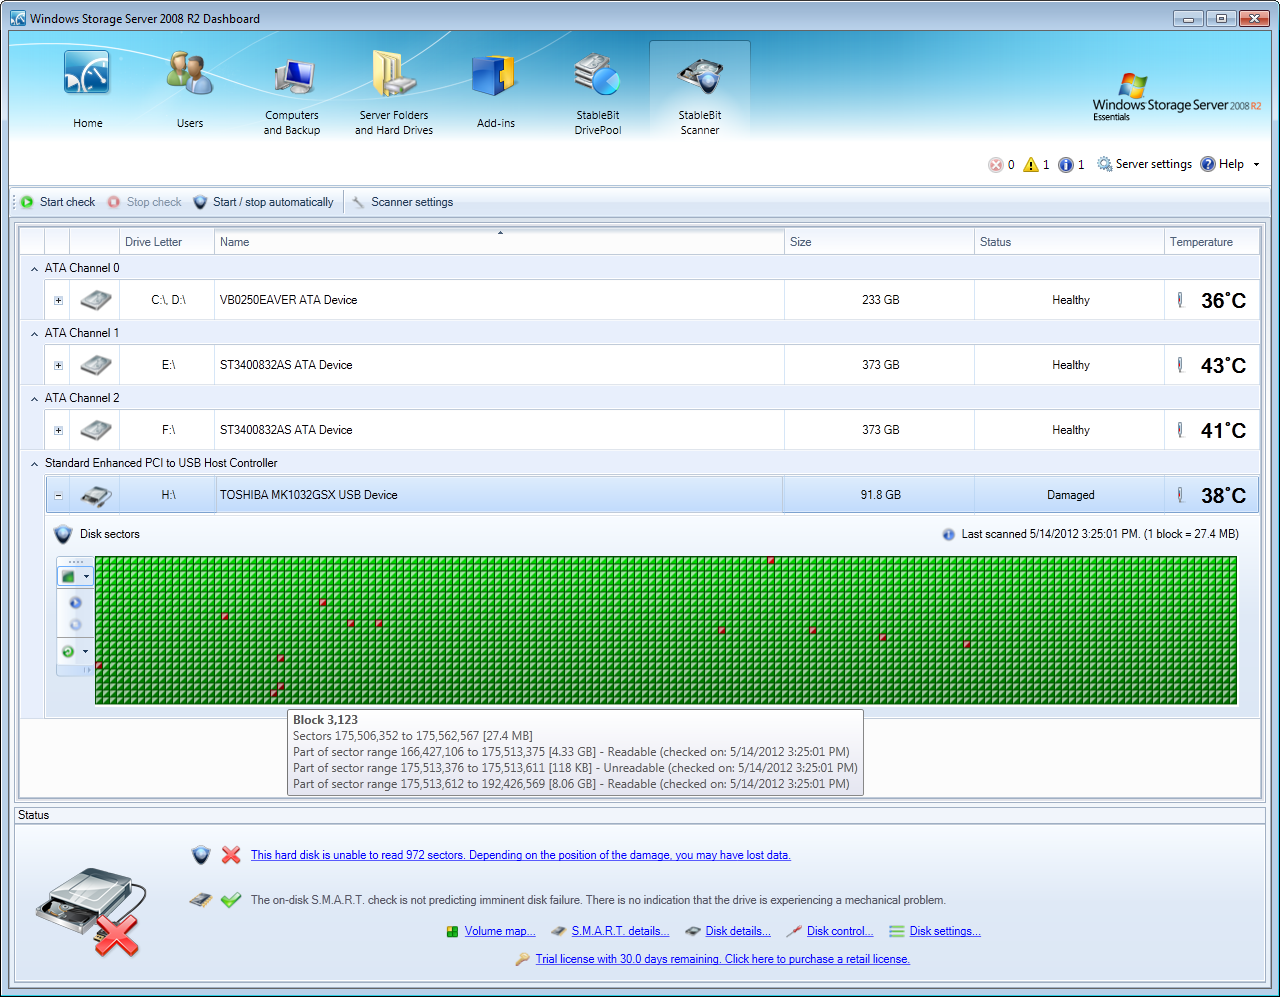
This particular block represents 118 KB of damage. The Scanner uses the convention of 1,024 Bytes = 1 KB everywhere it displays sizes.
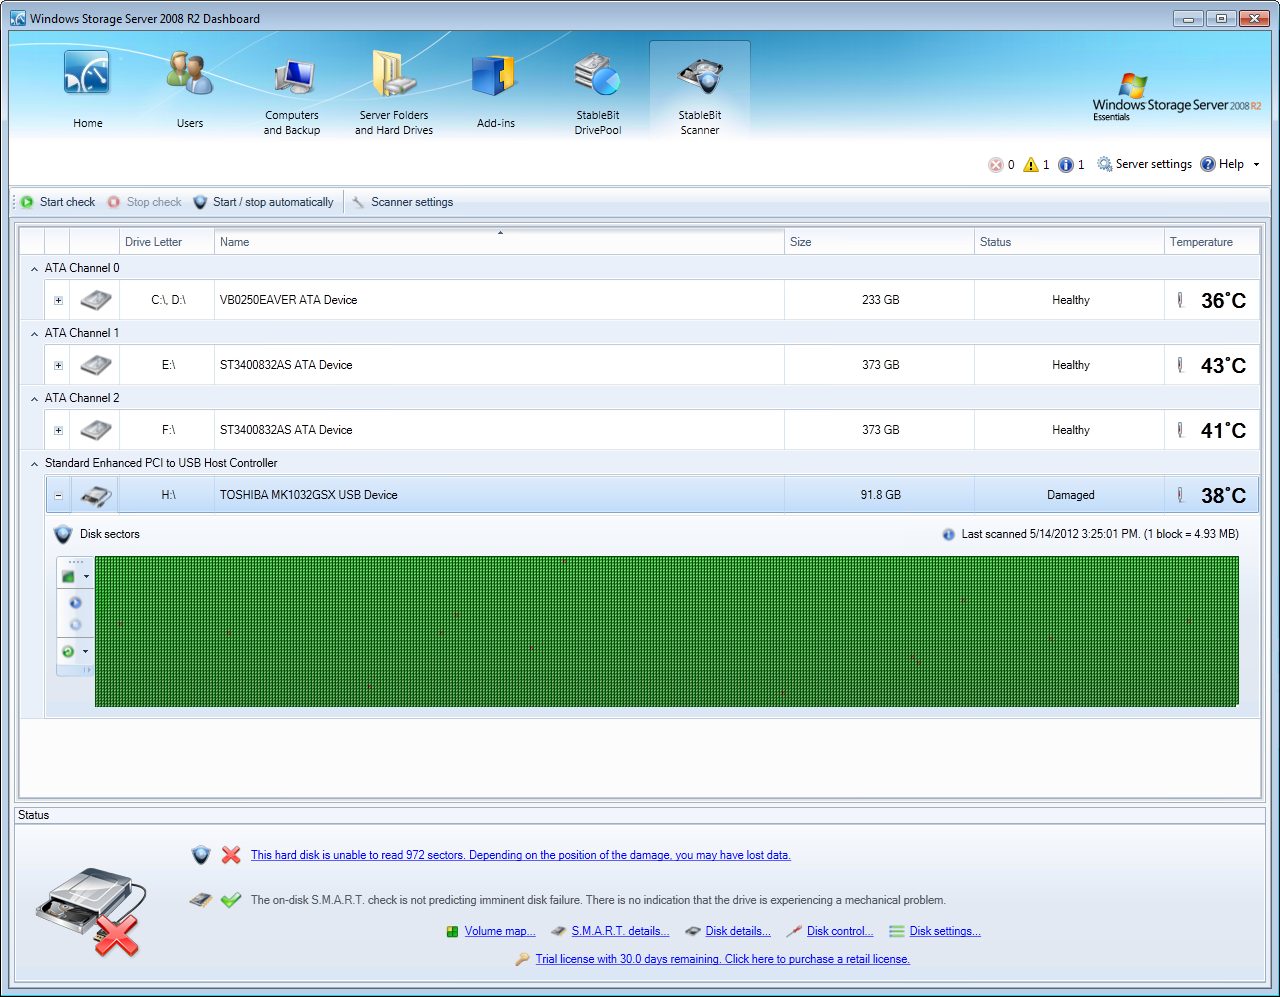
We can also switch the sector map to use smaller blocks to see more finer detail:
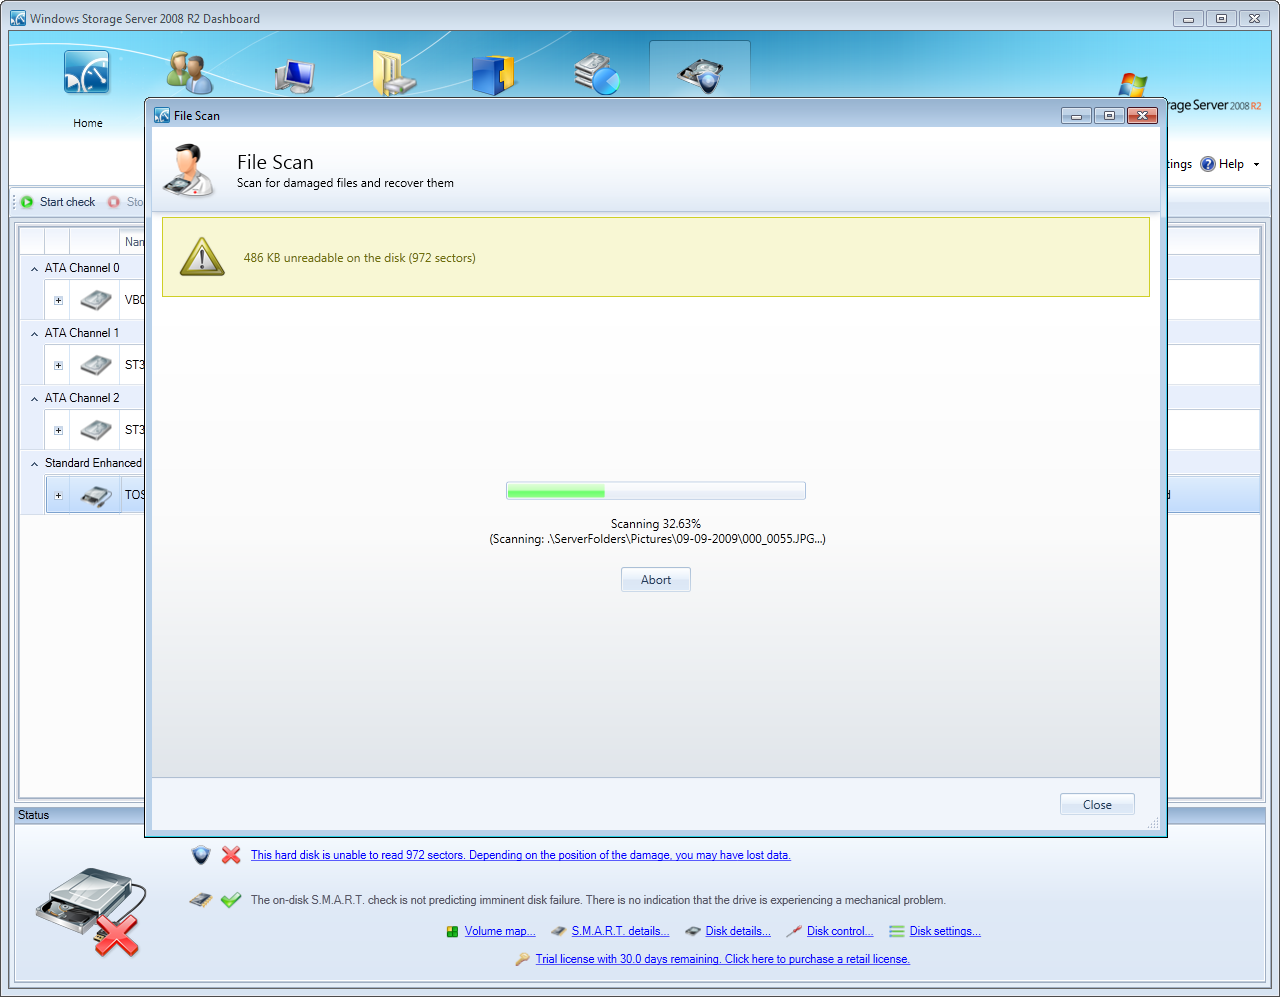
Scanning for File Damage
In order to open the File Scan interface, you can click the link at the bottom of the main window or right click on the damaged disk and select File Scan…
How it Works
Let me explain a bit about what the file scan actually does and why. Unlike conventional surface scanners that are able to scan the disk surface for damage and attempt recovery of bad sectors, the StableBit Scanner takes a smarter approach. After scanning the entire disk surface and mapping all the bad blocks, the Scanner answers the question, was any data lost and which data?
We can answer this question because the Scanner knows how to read NTFS, directly. Unlike others, it doesn’t use any Windows APIs for this. This is because we want absolute full control over parsing any damaged on-disk data structures. The Scanner knows which sectors are damaged, and it understands how to read the undamaged portions in order to determine what exactly is damaged, in terms of on-disk data.
So you can think of the file scan being much more than just a scan looking for damaged files. Actually, it examines every single data structure on its way to scanning for damaged files. Starting from the master boot record or the GPT, going down to the partition boot sector then the master file table, each directory structure and index and finally each file and its data. The Scanner will even examine on-disk data structures that are not directly related to file data, such as file metadata records, backup MBR / GPT, the MFT mirror and will report on any damage found there as well. It understands how to access the various backup data structures in order to continue its scan, even if the primary structure is damaged. It is a comprehensive NTFS scan, looking for any damaged data structures.
The File Scan can actually report on 17 different types of on-disk data damage. 16 of them are extremely uncommon, and primary file data damage is the most common. This essentially means that a bad sector has fallen in the middle of your data. The other 16 indicate on disk data structures that are not directly related to your data.
The reason why this is the most common type of damage is because primary file data represents most of the data on the disk, by far. After all, it basically represents all of your data that is stored on the disk. And so the chance of a bad sector falling inside primary file data is much greater compared to it falling inside some other data structure.
The StableBit Scanner provides for automatic file recovery of damaged NTFS files.
It does not support automatic recovery from the other damage types because those indicate intricate damage to the on-disk formatting and will require an expert human to go through the damage and reconstruct the data that was there. Luckily that type of damage is very uncommon, especially if you catch the failing disk as soon as it starts to have trouble, before the damage becomes very extensive, which is the whole point of running the StableBit Scanner.
List of Damage
The time it takes to conduct the file scan depends on how many files are on the disk and how many damaged sectors there are. The more damage, the harder the Scanner has to work to scan your disk. The Scanner does not try to re-scan known damaged sectors during a file scan, but will detect any additional bad sectors that may have developed since the surface scan completed.
The time to complete a file scan can range from a few seconds to a few hours.
After the file scan completes, you will see a list of damaged on-disk data structures (if there are any):
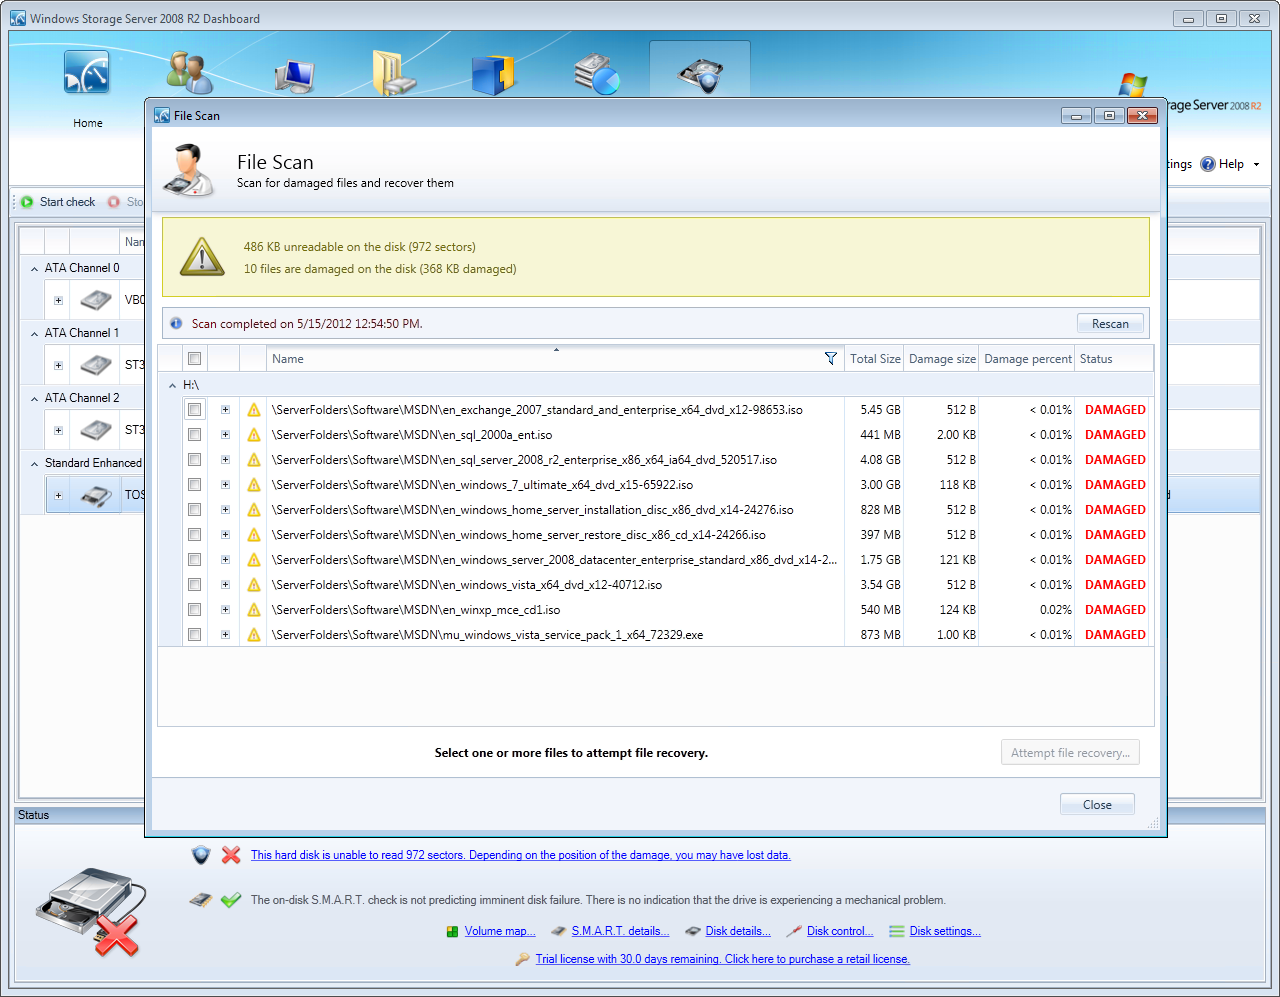
You can expand one or more on-disk data structures, to get more information about the damage. Each item in the list will typically be a file, but it could be some other damaged on-disk data. Expanding it will provide you with more details on what it is and how much of it is damaged.
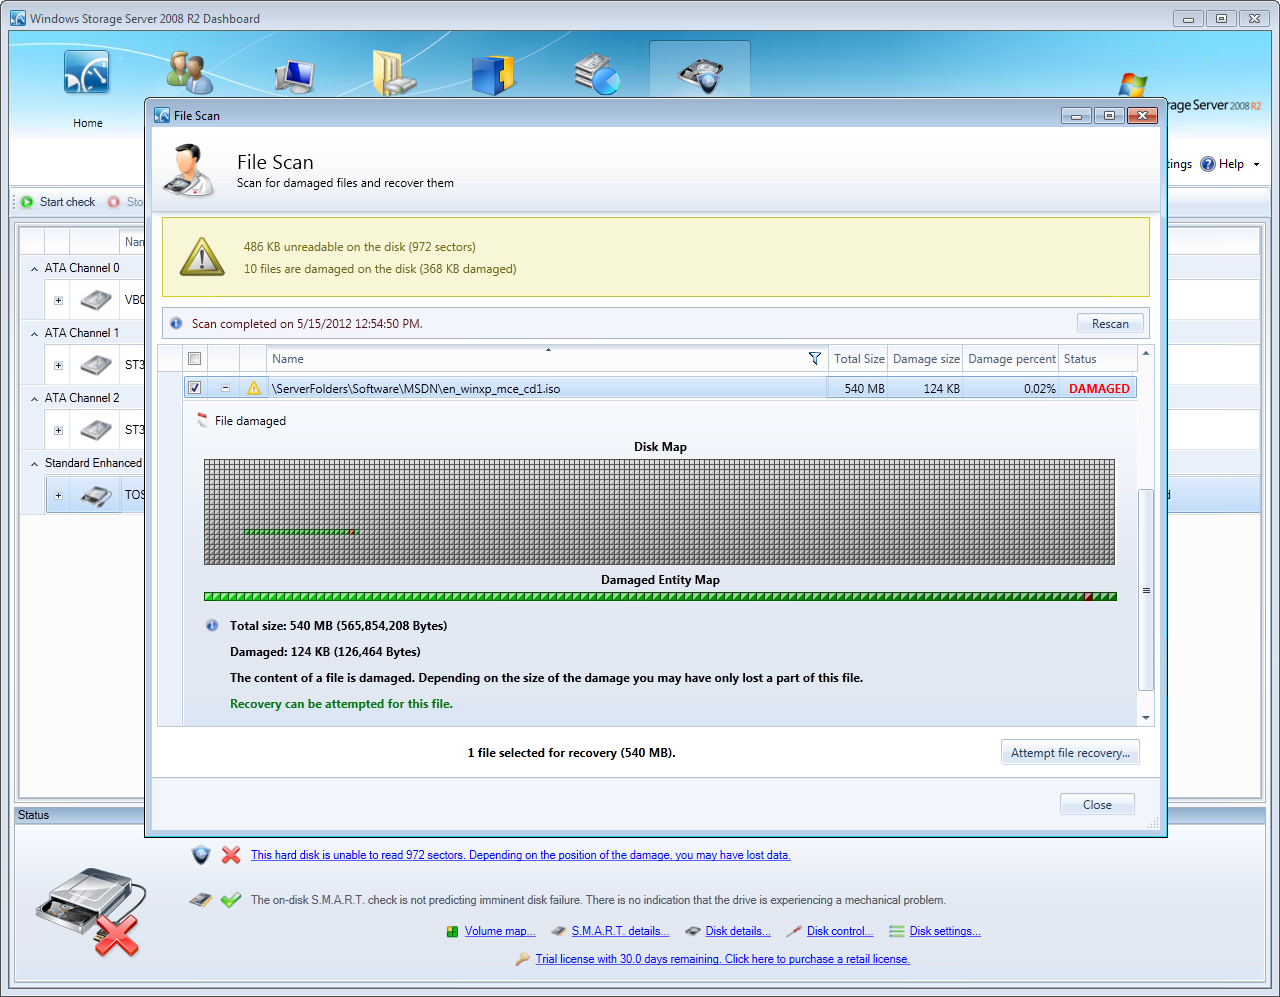
Here you will notice a few things represented.
On the top you will see a Disk Map. This represents a map of the entire disk surface and the green blocks represent the portions of the disk that the current data structure is occupying. The red blocks will represent the damaged portions.
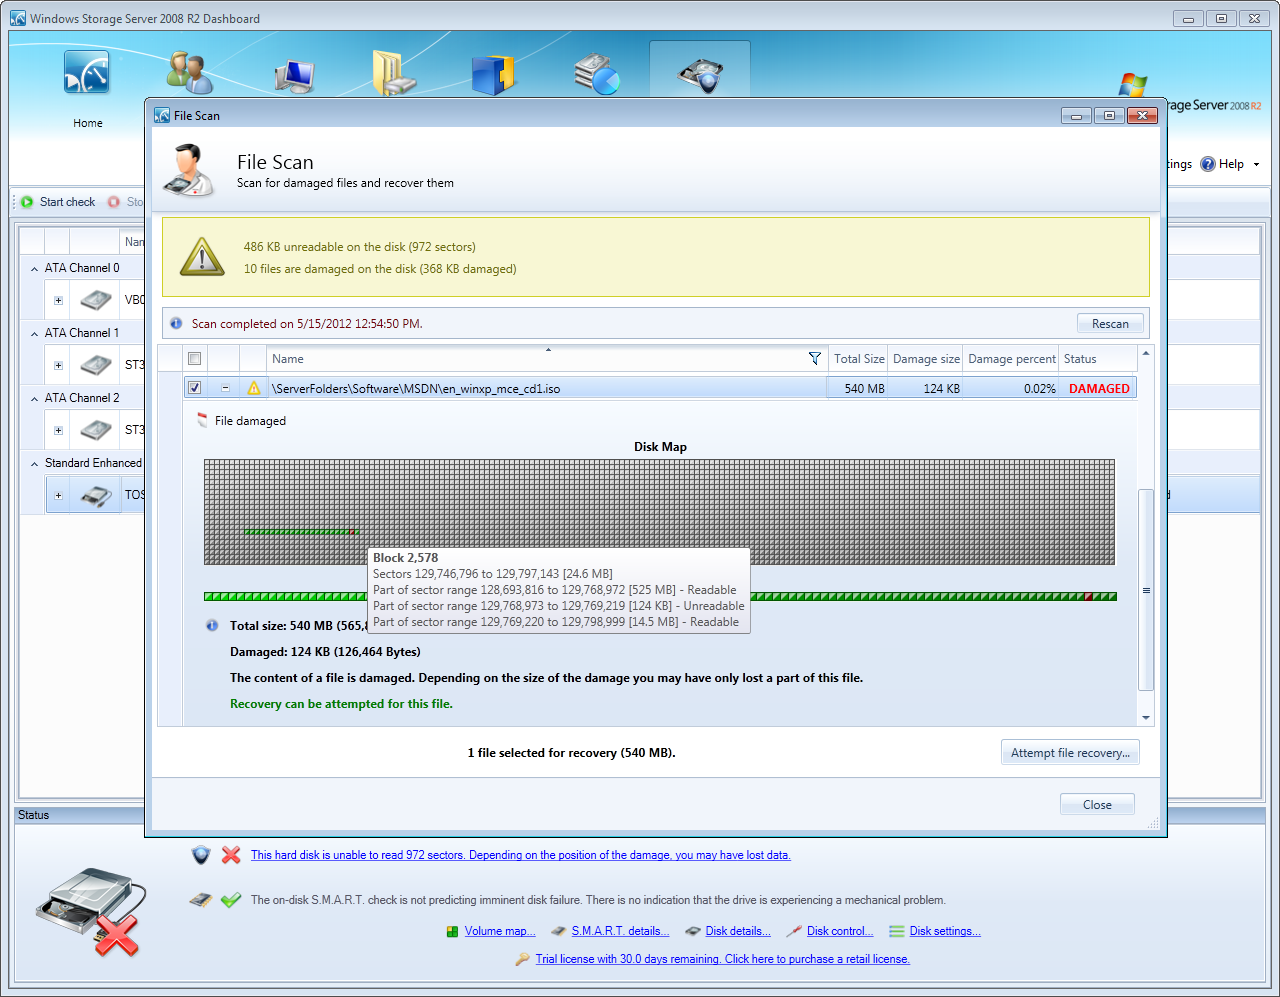
Hovering your mouse over the red blocks will reveal more detail:
Right below that you will notice the Damaged Entity Map. This is simply a representation of the entity and where the damage is.
You may wonder why we need both maps. But keep in mind that files may are not be stored contiguously on the disk. In other words, they can be chopped up into pieces and scattered all over the disk. The beginning of a file can be at the end of the disk and the end of the file can be at the beginning.
The Damaged Entity Map represents a view of where the damage is in the file. This can be extremely useful in understanding where the damage is, as you see the file in the Operating System.
For example, if you see a bad block at the end of this map, then you will not be able to read the end of that file in Windows, and the other way around.
Also, it’s interesting to note that NTFS typically reads file data in cluster sized blocks (4,096 byte blocks typically). This means that even if a single sectors (512 bytes) is damaged, a 4,096 byte block will be unreadable by Windows.
Since the Scanner doesn’t use NTFS and implements its own version of the file system, this limitation is not an issue. To the Scanner, if one sector is damages, then only 512 bytes are unreadable. These little details are very important when recovering files and the Scanner tries to be aware of all these things in order to do the best job that it can.
Attempting File Recovery
In order to recover the files you will need an external hard drive or a thumb drive, or some other destination to place the recovered files. It is not recommended to place the recovered files on the damaged drive, for obvious reasons.
At this point you can select one or more files for recovery and click Attempt file recovery…

Now it’s time to select the destination for your recovered files and some recovery options:

If you’d like, you can tell the Scanner to not attempt bad sector recovery at all. In this mode, the Scanner will write out all the known good sectors to the destination media and will skip all the bad sectors. This is useful if you have a lot of damaged data and would like to quickly get as much information out of the drive as possible. Bad sector recovery can take some time and selecting the option to not recover bad sectors will speed up the recovery process.
Once you click Start Recovery, the StableBit Scanner will go to work attempting to recover your files:

The Scanner first reads the known good sectors and then attempts bad sector recovery, for each file.
Each bad sector recovery attempt is driven by various head motion profiles. Some of the profiles are driven by a random number generator, which ensures a unique recovery attempt each try. The Scanner tries to read a damaged sector by altering the velocity and direction of the drive head on each attempt, in hopes of getting the drive to read the bad sector one last time.
On each attempt, for each bad sector, the Scanner tries 11 different recovery algorithms on that sector. This is what is considered to be one recovery attempt for a sector.
File Recovery Results
After the Scanner finishes its file recovery it will display the results like this:
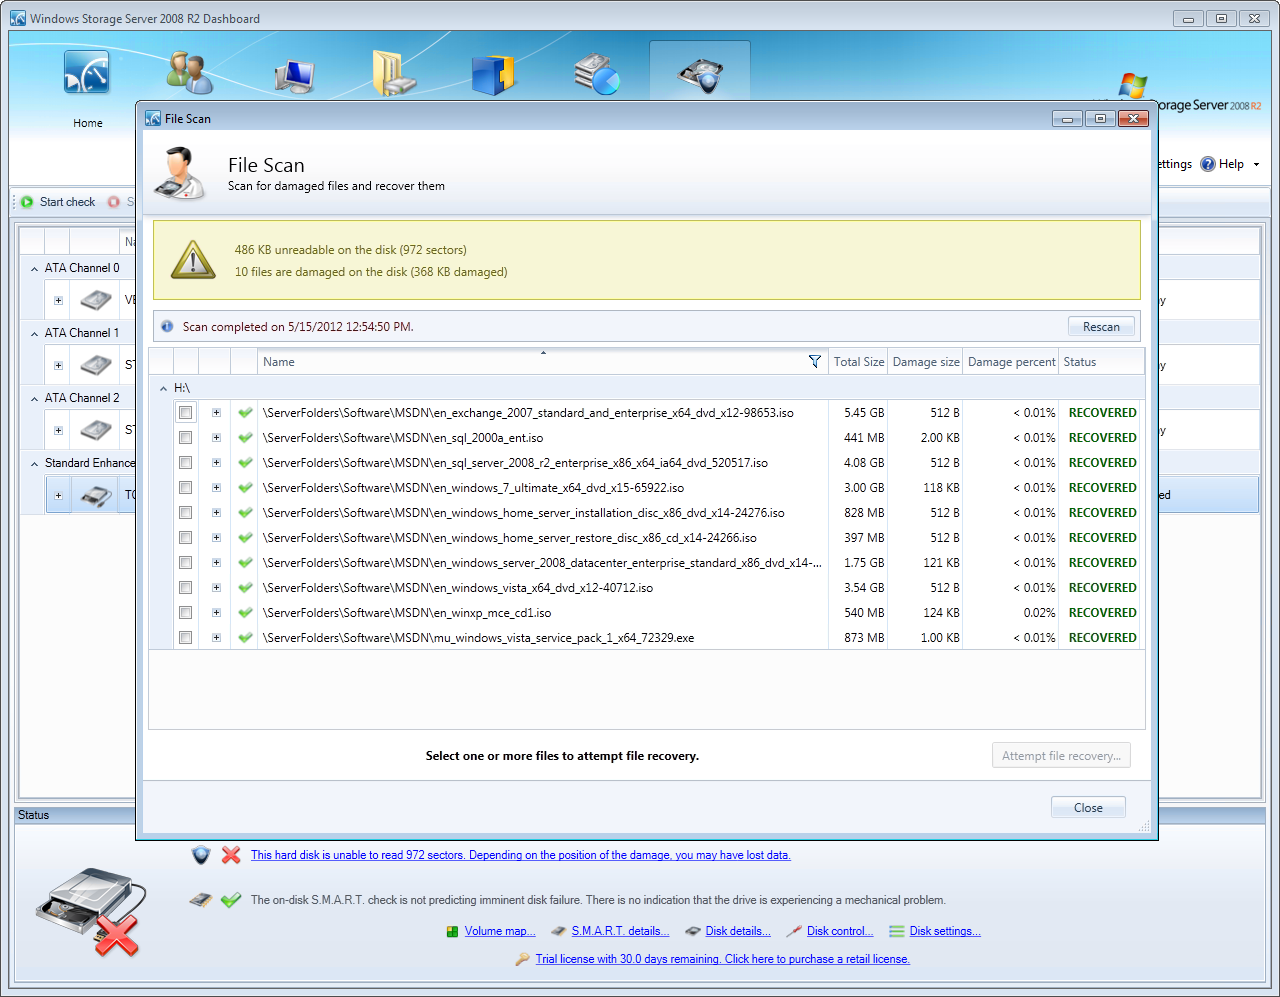
Note that because the damage was simulated for this blog post, all sectors were instantly recovered. It is possible for the Scanner to recover files partially or none at all. If the Scanner did not succeed at recovering one or more of your files you can re-attempt file recovery, but increase the bad sector retry count to something greater.
We can select each recovered file to see how much data and which sectors were recovered:

You can hover your mouse over any recovered block to get more information on that block:

At this point, your recovered files have been written to the recovery destination that you selected earlier.
Note that the original file on the damaged disk is still damaged, and the Scanner will continue to report disk surface damage and file damage for that disk. The Scanner does not write to the damaged disk during file recovery.
You should remove and replace the damaged disk at once. Continuing to use a hard disk after it has damaged one or more of your files is a really bad idea.
Conclusion
This concludes this comprehensive review of the file recovery system in Scanner 2.0. I haven’t written one of these long and detailed articles in a while now, I hope that some of you enjoyed reading it.
Next we will look at improving S.M.A.R.T. in Scanner 2.0.