This is the first in a series of posts describing the technology behind BitFlock. This time I’m going to focus on the cloud aspects of BitFlock.
BitFlock is really a service consisting of 2 pieces, a web page and an application designed to gather health information about your hard disks.
The application is designed to be as simple as possible and does not have much of a UI. I’ll talk about the different types of information that the application gathers in another post, but I’ll just mention that it doesn’t read any partition data, so your files are never read. Also, no writing to any of your drives is ever done.
Once the application gathers health information about your drives it uploads it to a web service running at https://bitflock.com using 128-bit SSL . From there, it’s assigned a unique “Nest ID†which is linked to the health data. The purpose of the Nest ID is to uniquely identify your set of data so bitflock.com can show it when you call it up from the web browser.
At this point, you can access your health data at:
bitflock.com/[nest id]
See bitflock.com/demo for an example of what this looks like.
Also, it’s worth noting that the entire web site operates over 128-bit SSL and will redirect any http traffic to https automatically.
Why Online?
When the BitFlock application gathers data from your hard drives, the information is retrieved and uploaded as binary chunks. When these binary chunks arrive on the server they’re stored in the database as binary chunks. No interpretation is done. Only when you view your nest is the information put together and interpreted in a way that makes sense.
This means that neither the BitFlock application nor the web service does any interpretation of the data at collection time. This is important because the interpretation of S.M.A.R.T. data in particular, is manufacturer dependent. So when a new drive model becomes available, or more information becomes available about an older drive model, BitFlock’s view of the health data for those drives is automatically updated. There is no need to deploy a new version of the application, or to re-run the scan process.
This is kind of an oversimplification. In reality, BitFlock does cache some interpretation data for efficiency. But there is a process to force a full nest update when necessary. Regardless, the result is the same.
How is S.M.A.R.T. Interpreted?
Just in case you’re not familiar with S.M.A.R.T., let me do a brief summary.
Summary of S.M.A.R.T. Data
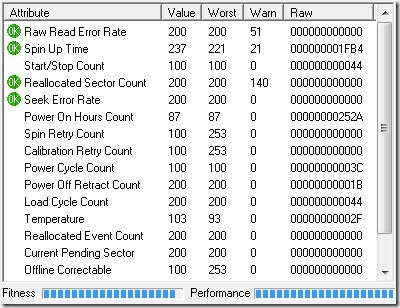
S.M.A.R.T. consists of many different pieces, but the part that most interests us is S.M.A.R.T. attributes and thresholds. This is what you typically see in many S.M.A.R.T. reading application. It’s usually shown in a table, and if you’re not familiar with its format, it can look very cryptic and daunting.
To the uninitiated, a complicated list of seemingly incomprehensible statistics.
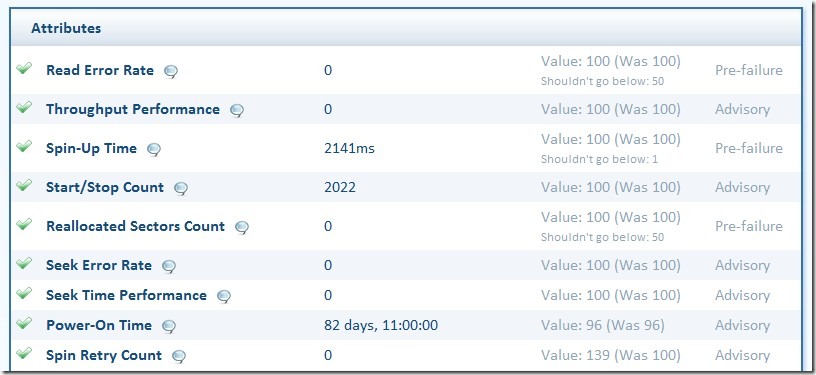
This is how BitFlock presents the same data:
Of course you don’t even have to look at this if you don’t want to. That’s because BitFlock will show you a summary for each drive in plain English right on the front page of each nest.
Attribute / Threshold Pair:
It is generally accepted to say that an attribute / threshold pair consists of the following parts:
- Type (or ID) – See Wkipedia for a list of known types.
- Status – Indicates whether this attribute is purely related to drive age or is indicative of failure.
- Attribute Value – This is a number from 0 to 255. It has no meaning other than the fact that it shouldn’t fall below the threshold.
- Threshold (or Warn) Value – The attribute value should not fall below this value. If it does, then depending on the Status it can mean different things.
- Minimum (or Worst) Attribute Value – This is the lowest that the Attribute Value has dropped to in the past.
- Raw Value – Depending on the Type, this gives us different statistics about the health of the drive.
This is how S.M.A.R.T. predicts drive failure, when an attribute value falls below the threshold value for any attribute with the status of “Pre Fail Advisory†the drive is expected to fail within 24 hours.
 This is useful and of course BitFlock detects this condition and flags the drive with a red health icon if this ever occurs.
BitFlock’s Further Interpretation
The power of BitFlock is that it goes one step further than the general S.M.A.R.T. interpretation. BitFlock works directly with the Raw Value to check if any of them are indicative of trouble. But before it can do that it needs to identify your disk type. It does this by reading the model / firmware pair from the drive. It tries to find an interpretation group from hundreds defined in the database. This list is constantly updated as new drives are released and more information becomes known.
Once it finds an interpretation group it builds an interpretation table, where it lists each attribute type that should be checked for certain conditions in the raw value that indicate trouble. For each attribute that indicates potential trouble, the check algorithm and the plain English warning type is also listed.
BitFlock generates a way to check your drive, that is specific to your hard disk model. If any of these attributes trigger a warning condition, a yellow icon is shown for that disk with an explanation.
In addition the check data, the attribute table contains information on how to decode each individual raw value into a human readable format.
So basically for each attribute BitFlock knows:
- The name and description of the attribute
- How to display the value of the attribute in a human readable format.
- Whether this attribute should be checked for out of the ordinary values and which algorithm to use for this check.
- If the attribute has triggered a warning, how to display it in plain text.
And this information is specific to your drive model.
An Example
Time for an example to clear this up. I like realistic scenarios, so let’s take a real drive from the demo nest.
Let’s say you have a hard disk with the model ST3500630AS and firmware 3.AHG.
BitFlock sees this and tries to find an interpretation group than matches that serial number / firmware pair. Failing to find a specific interpretation group, BitFlock will try to find an interpretation group that is not firmware based. This type of firmware-less interpretation group is used where all the drives for a particular model behave the same way, regardless of firmware.
With this method we can target a particular model with a particular firmware with one interpretation group, and then have another catch all group for all the other firmwares. It’s useful to do this if a firmware version has a bug in it that affects S.M.A.R.T. This way we can work around the bug automatically. In fact, BitFlock does this very thing for a number of drives.
Our interpretation table is built up for each attribute as described above. Let’s just go through one of these attributes to show how cool this is.
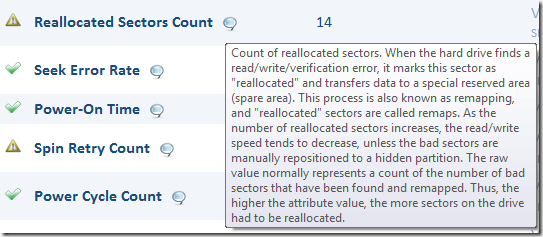
Say we’re looking for an interpretation of Attribute ID 5 (Reallocated Sectors Count). We know that the drive belongs to the interpretation group Seagate Barracuda 7200.10 family, because we identified it earlier. We then ask the system if there is a model specific interpretation entry for a Seagate Barracuda 7200.10 family drive. If not, then we ask for a generic, non-model specific, interpretation of attribute ID 5.
Once we retrieve the interpretation entry we know a few things.
We know the attribute name and description:
We know how to combine the raw attribute bytes to display them in a meaningful way.
We know how the check for a warning condition on that attribute.
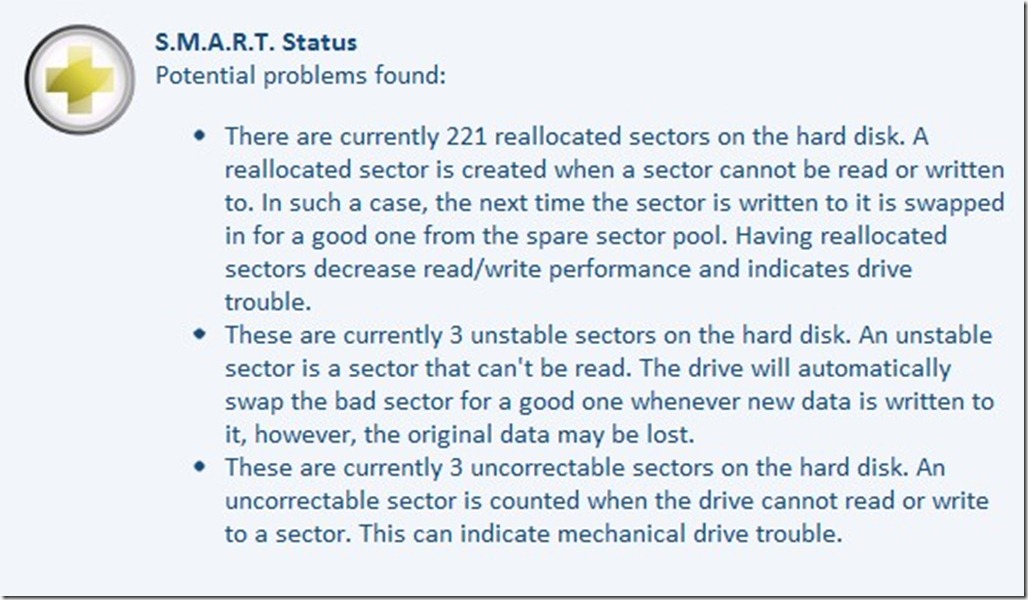
We know how to generate the plain text warning message if the warning is triggered:
This makes the system very flexible and powerful. We can now essentially build a custom health report tailored to your specific drive.
By the way, I picked attribute 5 on purpose. Attribute 5 is generally the number of sectors in the G-LIST (see the Wikipedia entry for bad sectors). This is the number of sectors that went bad since the drive left the manufacturing plant.
A SSD Example
An example that takes better advantage of this system would be a SSD drive.
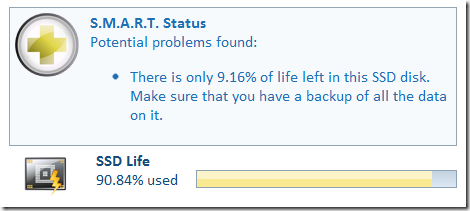
Back to our demo nest, let’s look at the INTEL SSDSA2M160G2GC drive. This is a Generation 2 Intel SSD drive. It comes with an on-board lifetime indicator. However, the attribute is encoded differently, and in order to calculate the percentage you need to do some math on it.
None of this is a problem for BitFlock. We don’t need to deploy a new version of the application, all we do is add some new interpretation entries targeting that specific interpretation group. That’s it. Now the system knows how to tell you about drive lifetime. It also knows to warn you when you’ve used up more than 90% of it.
This is the power of BitFlock’s cloud architecture.

